My Dad's Pork and Cabbage Dumpling Recipe

(Photo: Kimberly Wang)
Whenever my parents come to visit either my brother or me, they usually make hundreds of dumplings to stock up our freezers with. Even though we’re adults and have been living on our own for years, I suppose our parents always want to be sure we don’t starve. Well, Mom and Dad, teach a woman to fish! This is my dad’s own recipe, though I’ve tweaked it a bit. This recipe makes about 85 dumplings, and I’ll teach you how to make the filling, wrappers, and dipping sauce, as well as how to freeze and store. It’s a long process but think of it this way: one day’s of hard work is weeks of easy, delicious meals. Also, if the process of making wrappers is too tedious, there’s no shame in buying the wrappers in bulk.

(Photo: Kimberly Wang)
Ingredients
Makes approximately 85 dumplings
Wrapper
4 cups of all-purpose flour
1/2 teaspoon of salt
10 fl. oz. of boiling water
Extra flour for spreading on your kneading surface and plates
A rolling pin
A food scale
Filling
1/2 head of cabbage, small diced (you can also make this recipe using 1 lb. of Chinese chives, AKA 韭菜)
1/2 teaspoon of salt
2 lbs. of ground pork (70% lean, 30% fat, ideally from the hindquarters)
1 tablespoon of rice cooking wine (米酒)
1 tablespoon of Shaoxing cooking wine (紹興酒)
3 tablespoons of soy sauce
1 tablespoon of dark soy sauce (老抽)
1 1/2 tablespoons of grated peeled ginger
4 stalks of scallion, cleaned and sliced
1 tablespoon of sesame oil
2 tablespoons of cornstarch
2 eggs
4 tablespoons of water
1 teaspoon of white pepper
Wrapping
A bowl of clean water
A spoon
2 large plates, sprinkled with flour
2-3 gallon-sized freezer bags
Sauce
Soy sauce
Sesame oil
Vinegar
Sriracha
Sugar
-or, if you’re lazy like me-
Soy sauce

(Photo: Kimberly Wang)
Directions
Wrappers
1. If you’re making your own wrappers, I’d recommend making them ahead of the filling to allow your dough time to proof. Add flour and salt into a large bowl and mix well.
2. Add your boiling water into the flour in small batches, mixing well between each time. If using your hands to mix, be careful not to burn yourself. After the water is incorporated, mix by hand until you form a sticky dough.

(Photo: Kimberly Wang)
3. Sprinkle flour on a large surface. Knead by folding the far end of the dough into the center and using the heel of your hand and your body weight to push the dough downwards and outwards. Give the dough a quarter turn and repeat. Knead for 10 minutes to develop the gluten in the flour.
4. After your dough has become even and less sticky, tuck the sides under and gather it into a ball. Put it back into the bowl and cover with a wet cloth and let it proof for 45 minutes. Proceed to make the filling before returning to step 5.

(Photo: Kimberly Wang)
5. After letting your dough rest, remove the ball of dough from the bowl and using your finger, poke a hole through the center. Expand this hole and it is big enough to fit both hands. Then, turn the dough in your hands and squeeze to even out your ring of dough like you’re making a very large bagel. Keep squeezing and evening out the sides until your ring is about 2 inches thick.
6. Place your ring back onto a flour surface and using a knife, cut your ring on one side to turn your ring into a long rope. I recommend making your wrappers in batches of 20 and keeping the dough in the bowl under the wet cloth. Fresh dumpling wrappers dry out very easily.

(Photo: Kimberly Wang)
7. To make your wrapper, slice a 1/4 inch disc of dough from your rope (if you have a food scale, it should be 8 grams) and flatten with the palm of your hand. Take your rolling pin and roll your dough flatten the sections into a round wrapper. Aim for a circle with a diameter of 4 inches and a thickness of 1.5 mm thick. Place on a floured plate and sprinkle with flour to keep your wrappers from sticking together. Then, cover your wrappers with a wet paper towel to keep your dough from getting too dry.

Filling
1. Place cabbage in a large bowl (ideally, in a salad spinner if you own one) and sprinkle with salt to extract water. Mix by hand and after the water has been drawn out, pour out the cabbage water. This step removes the natural bitterness of the vegetable and gives you a sweeter taste. Skip this step if you’re using Chinese chives. If your cabbage was in a spinner, transfer it into a large mixing bowl.
2. Optional step, put your ground pork on a cutting board and give it an extra few chops if you want a finer texture to your dumplings. Then, place your pork into the bowl along with cabbage.

(Photo: Kimberly Wang)
3. Add all remaining ingredients into the bowl, and mix using a pair of chopsticks. How to mix is really important: make sure you mix in one direction until it’s easy to pull your chopstick through the filling. The reason why you want to mix the filling in one direction is that this draws out and aligns the proteins in the meat. The protein alignment creates a net that is better at retaining moisture, so you get a plump and chewy filling. Keep mixing until your ingredients are all well-blended and you draw out a stringy texture in the pork. See the photo above for reference.
Wrapping

(Photo: Kimberly Wang)
1. Place a wrapper in the palm of your hand and scoop an ball of filling (approx 1 tablespoon) into the center. Next, dip your finger in water and trace water along the top half perimeter of the wrapper.
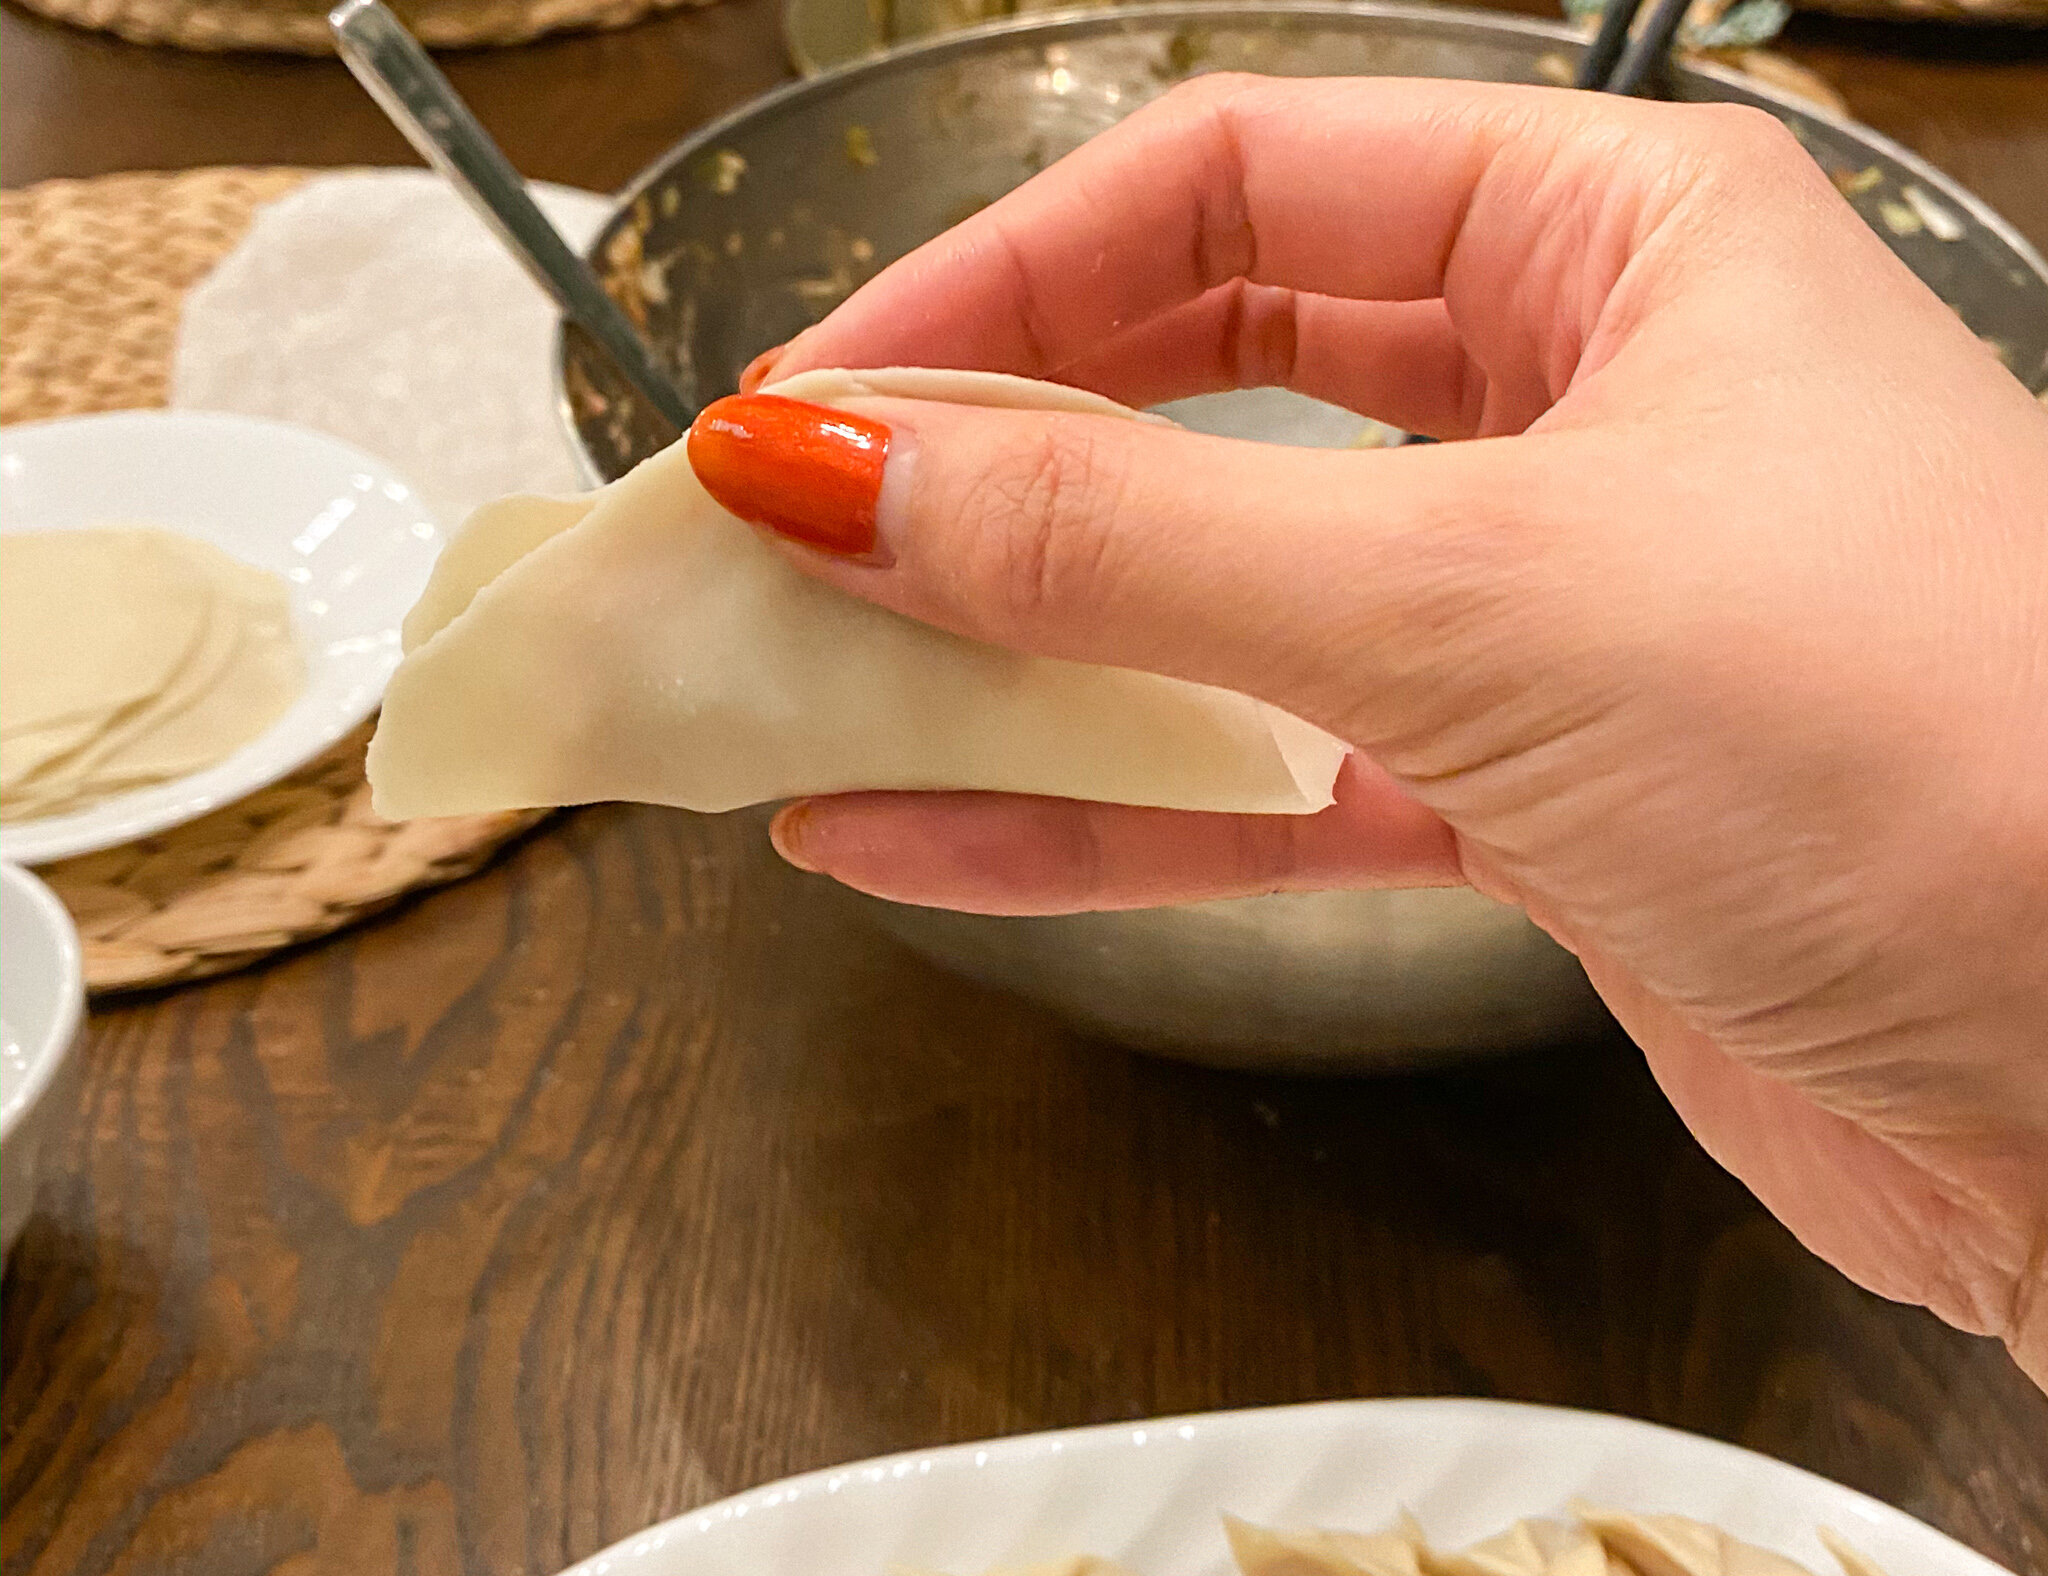
(Photo: Kimberly Wang)
2. Fold by sandwich folding the bottom of the half of the wrapper to the top. Pinch in the center to seal the center point.

(Photo: Kimberly Wang)
3. Next, half an inch to the right, create a small fold and pinch this fold flat to seal. Create another fold to the right of the first fold and pinch again. Pinch down the right to the end to seal up the right side.

(Photo: Kimberly Wang)
4. Repeat step 3 on the left side of the dumpling. If your dumpling skin is too dry, dip your finger in water before pinching.

(Photo: Kimberly Wang)
5. Make sure there dumpling is completely sealed so that the filling doesn’t come out while cooking.

(Photo: Kimberly Wang)
6. Place the dumplings on the floured plate. When you fill up your plate, place the plate into the freezer uncovered and move on to platter two. When you finish wrapping dumplings for your second plate, the first plate of dumplings should be solid enough to transfer the dumplings into a gallon-sized freezer bag. Be sure to mark the freezer bag with the date. Dumplings can be frozen for up to three months before you risk freezer burn.
Cooking
1. Bring a pot of salted water to boil. It’s really important that the water has to be at a boil before placing the dumplings in the pot.
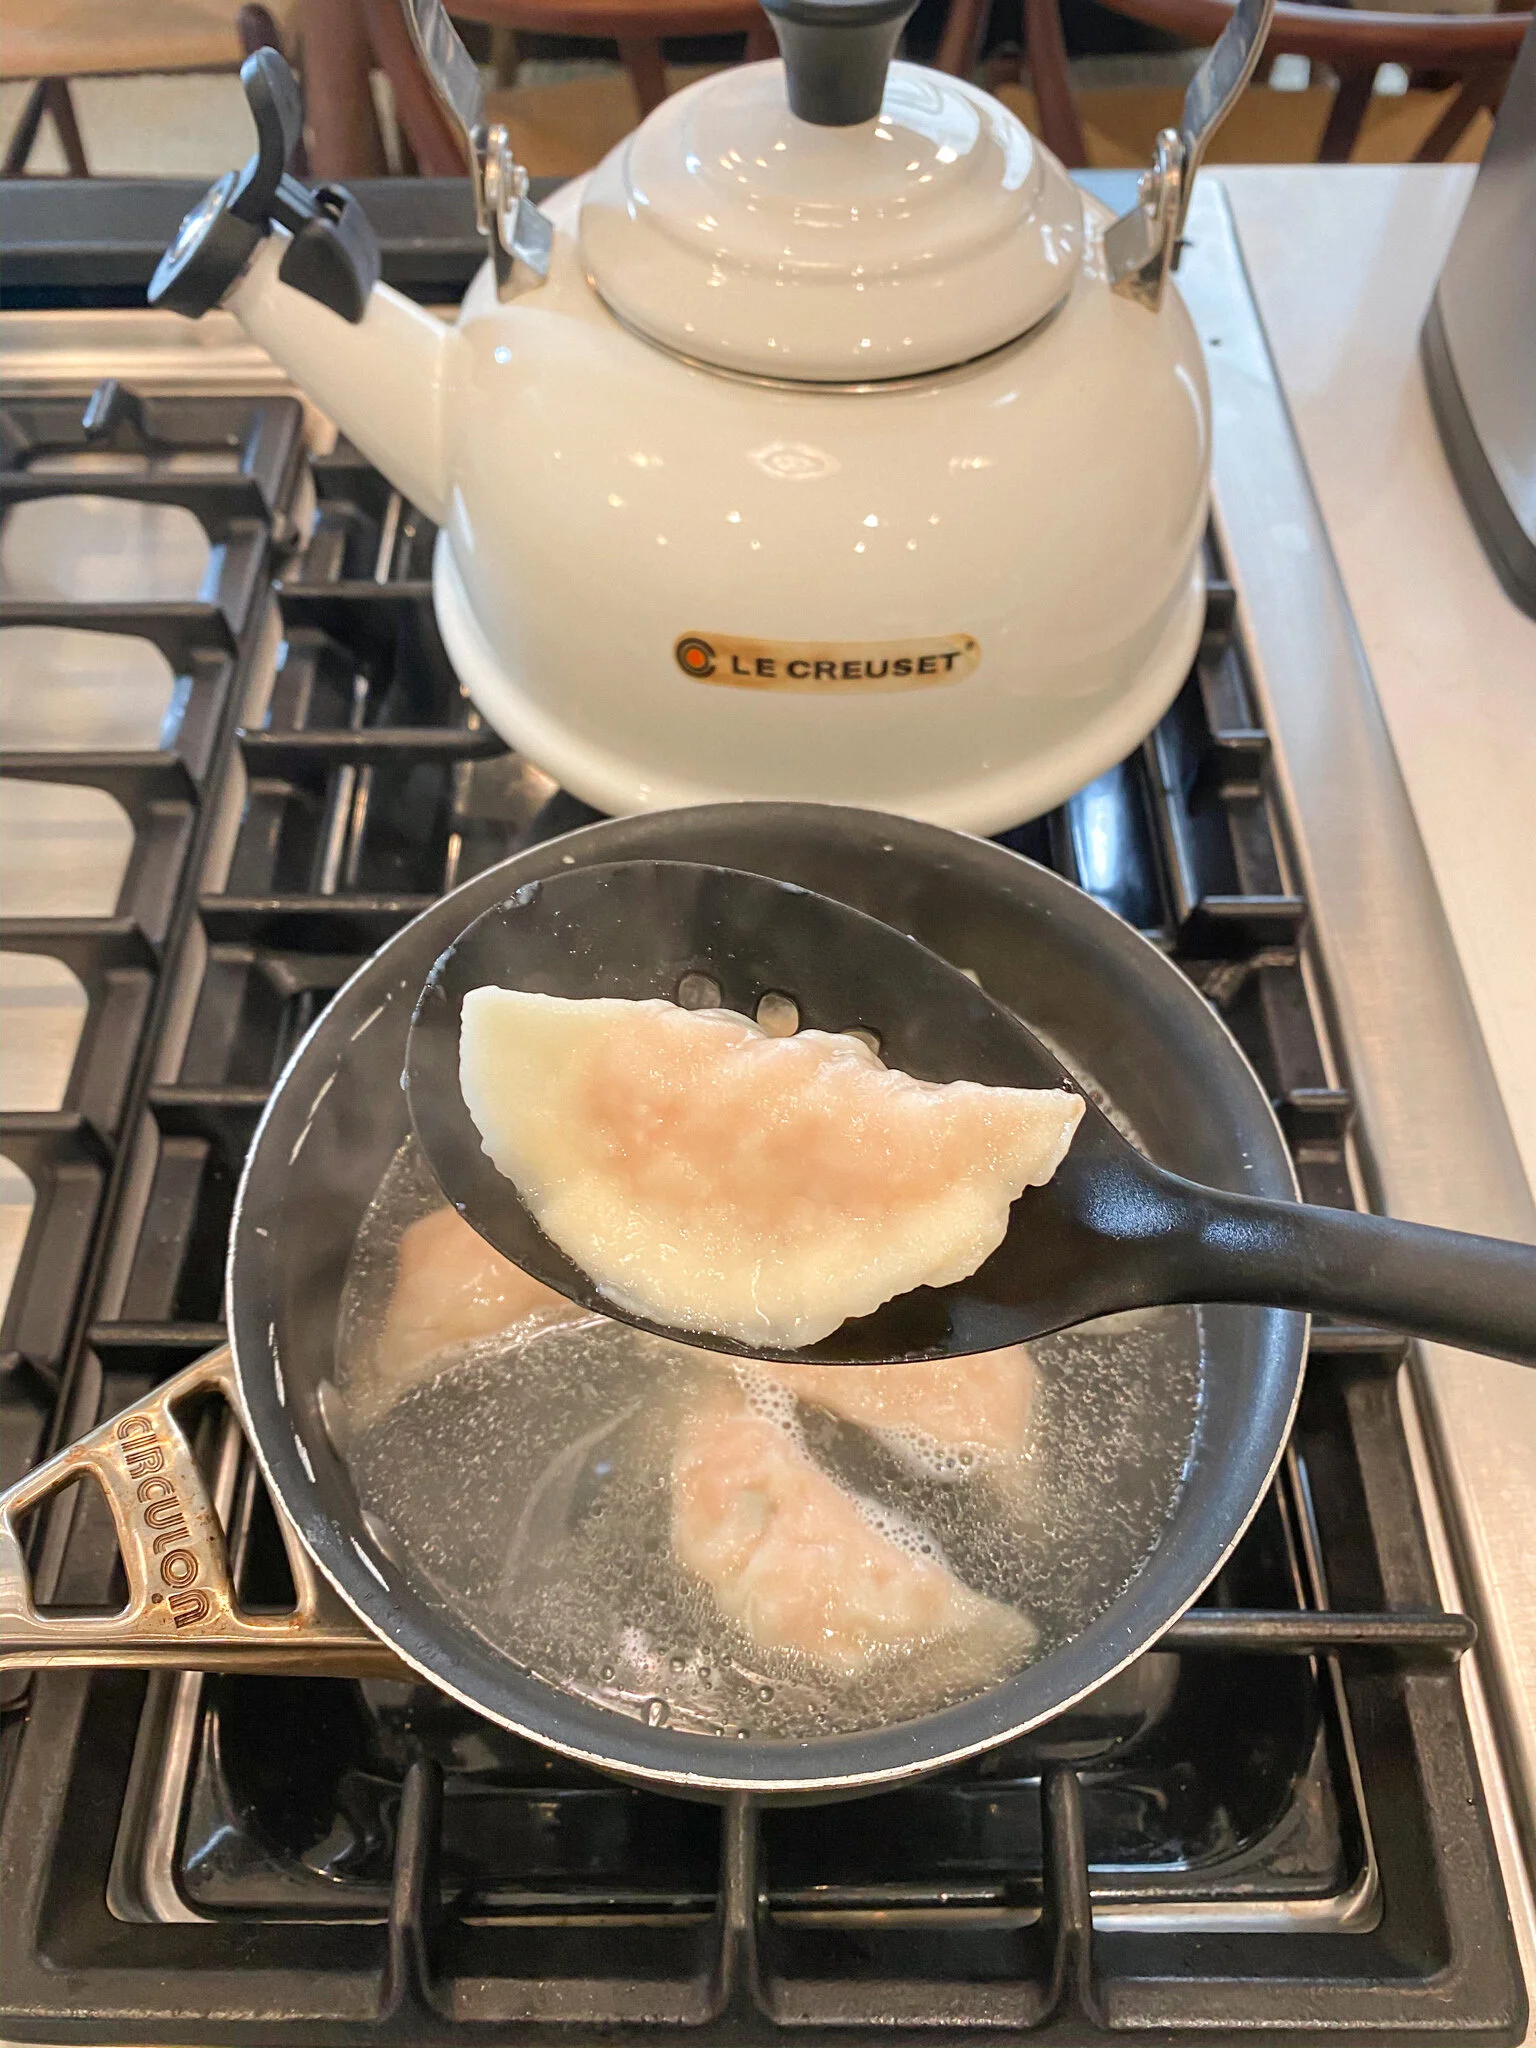
(Photo: Kimberly Wang)
2. Cook for six minutes for fresh dumplings and eight minutes for frozen dumplings. Be sure to give the dumplings a good stir about a minute in to keep them from sticking to the bottom of the pot. You can tell they’re ready when the dumplings float to the surface and the skin becomes slightly translucent.
3. Remove from the pot and make your sauce by mixing sauce ingredients in a small bowl. You can adjust amounts to your personal taste. Then dip, eat, and enjoy.

(Photo: Kimberly Wang)
Stay in touch! Follow me on Instagram and Facebook to be the first to know when I post.
(Featured photo: Kimberly Wang)
While The Off Hours may at times use affiliate links, we always offer genuine editorial recommendations. As an Amazon Associate we earn from qualifying purchases at no additional cost to you. Thanks you for helping me keep this blog going.