How to Do a Cut Crease with a Spoon
(Photo: Johanna Kosinska)
I recently joined a group on Facebook for Asian makeup enthusiasts, and one thing I’ve been super impressed by is how incredibly warm and helpful everyone seems to be in the group. I’ve also seen repeated questions on how to achieve that very popular Instagram cut crease look. Years ago, I learned about the spoon trick from makeup guru Brittney Foley, AKA beautifoles, and it blew my mind.
What I realized though, was that as an Asian person, this trick was particularly nifty in helping my locate exactly where to draw my crease, because the truth is, our eyes are often shaped differently. In our upper eyelids, we have pads of fatty tissue, which can obfuscate where this “crease” exists in, say, a Causcasian eye.
But that’s not to say that Asians can’t also achieve a dope cut crease. Yes, we can. In fact, if you were in my Facebook group, you’d see countless makeup mavens posting their stunning face beats. And there are lots of different ways to successfully achieve this look, but this is my super easy way to do it.
I decided to demo a warm, peachy orange-brown cut crease for you guys today but feel free to use whatever shades you’d like. It’s great if you’re a beginner, and I’ve added in couple of tweaks I’ve learned from doing it on my own Asian eyes.

(Photo: Kimberly Wang)
What I used
Below is what I used to achieve this look. Feel free to use what you have. The links are only for reference to those who don’t know to which brushes I’m referring.
Liquid eyeliner
Mascara
False lashes
Lash glue
A spoon!

(Photo: Kimberly Wang)
Prep your lid
Start by prepping your lid with the primer of your choice. I’m a big fan of Amazing Cosmetics Illuminate Eye Primer ($24). Primer is key for such a glam look because it’ll help bring out the pigmentation of your shadows and also ensure that your eye makeup doesn’t budge.
It’s also often recommended if you’re going to do a heavy shadow look like this one to do your eyes first and your face after, so you can clean up the fallout.
Step one
(Photo: Kimberly Wang)
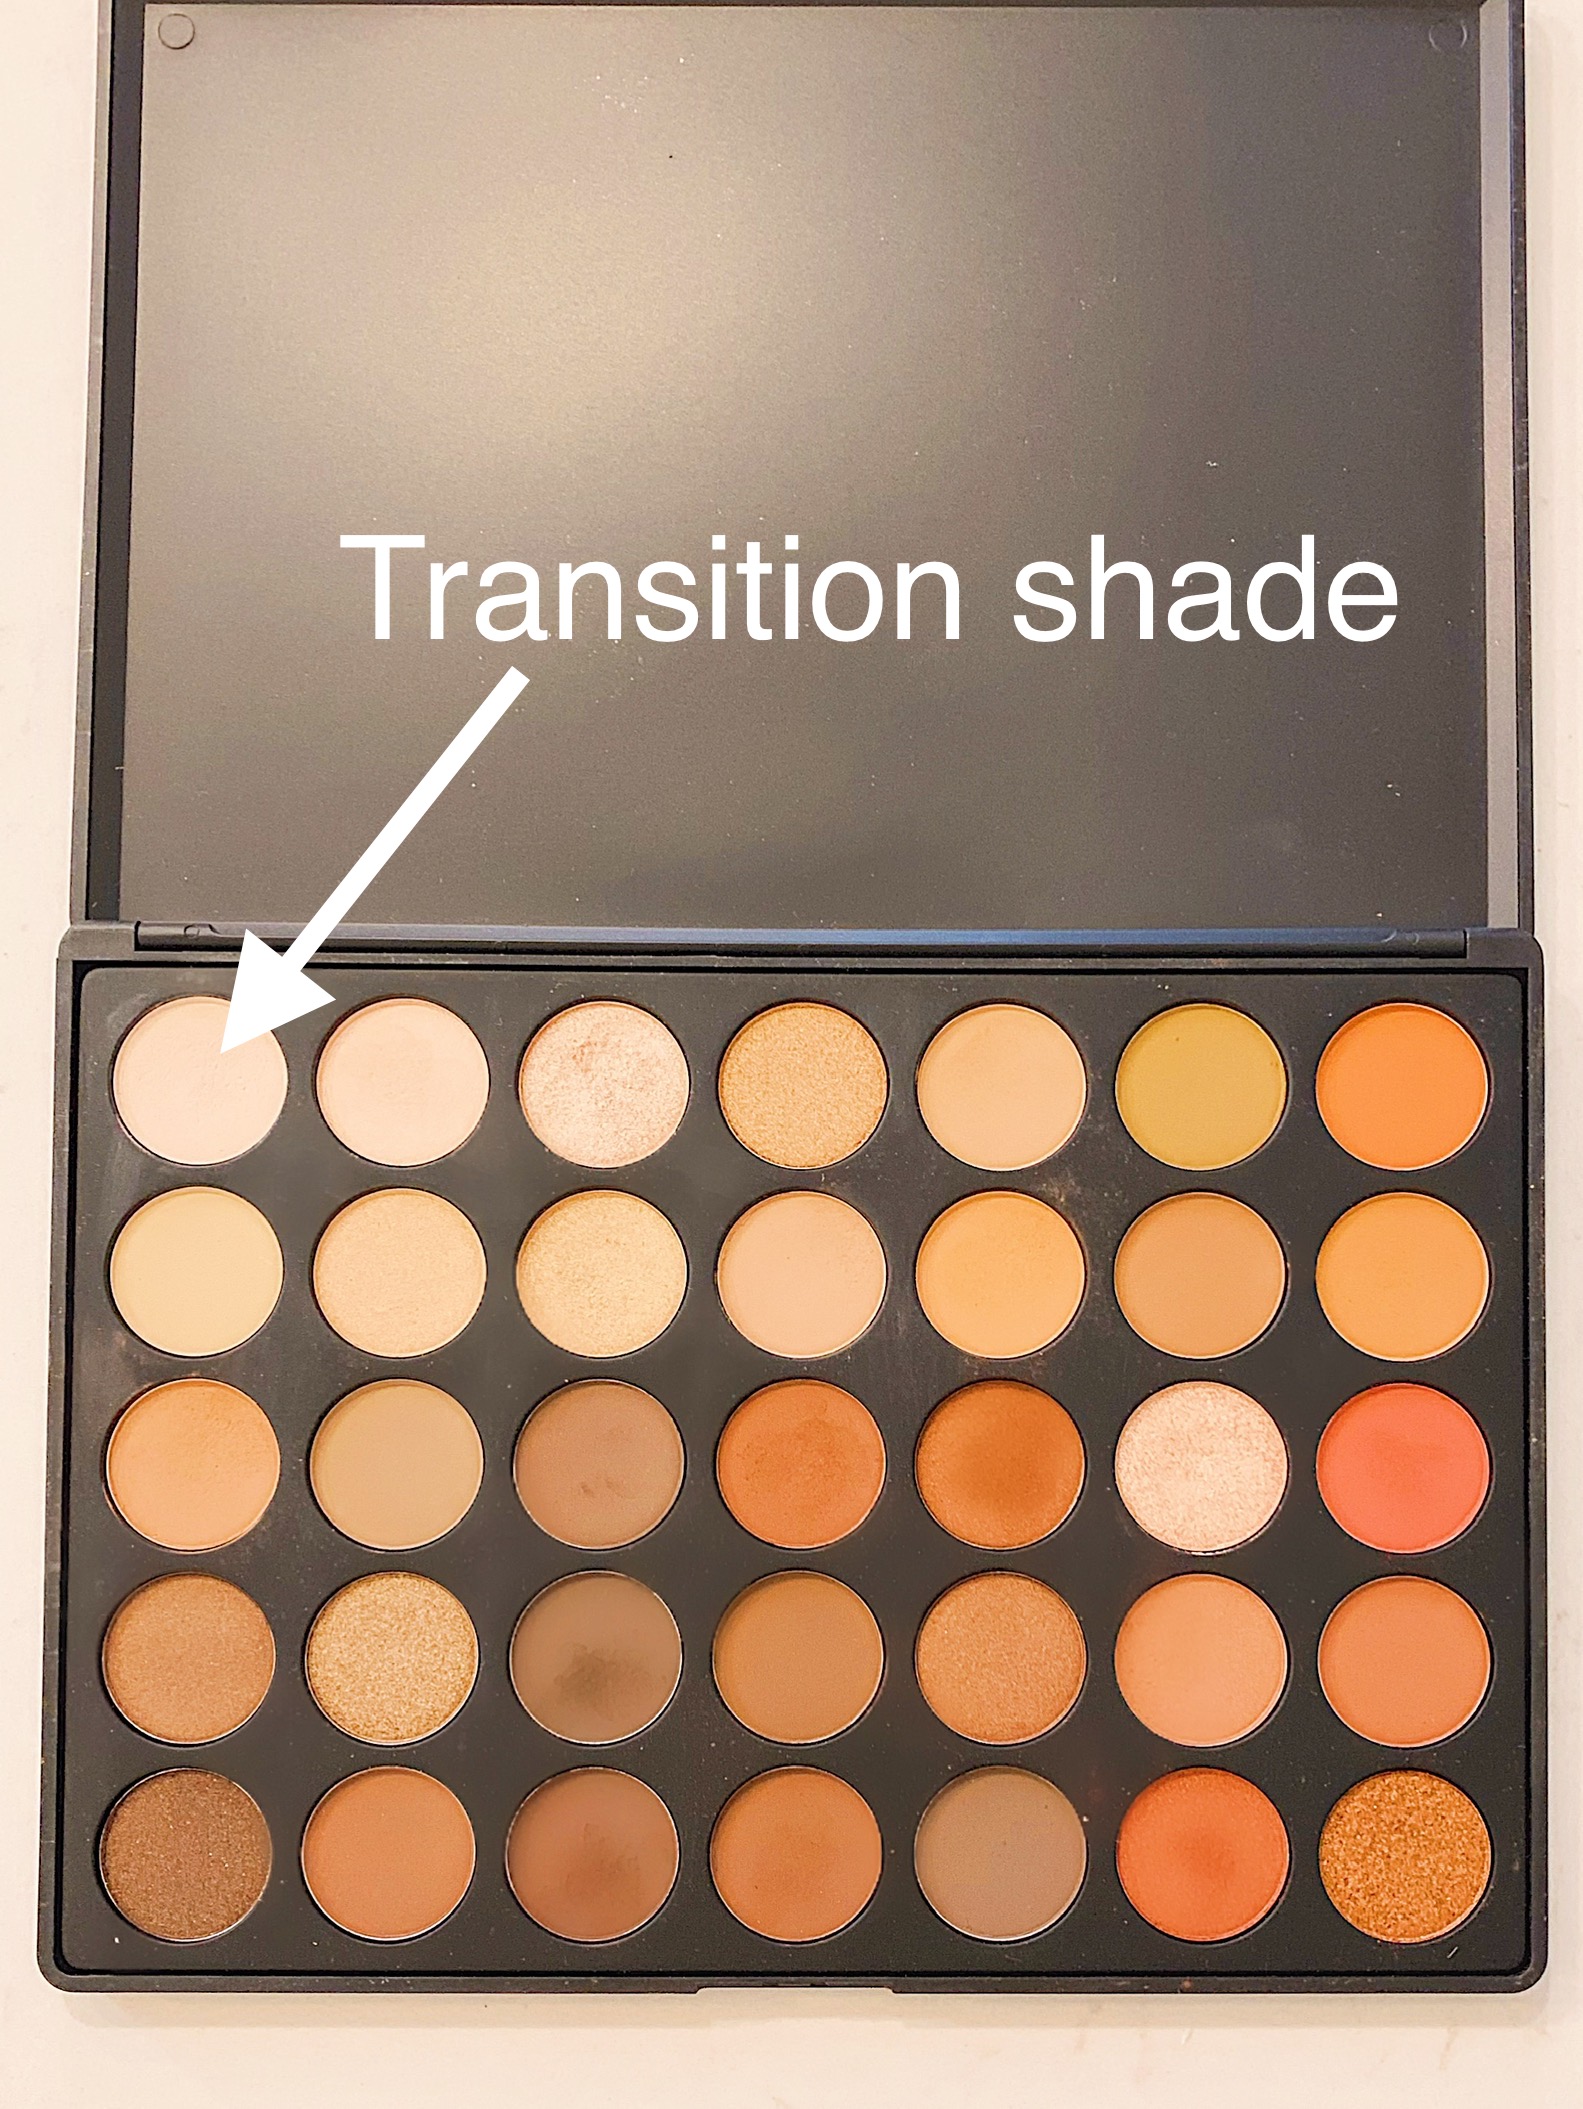
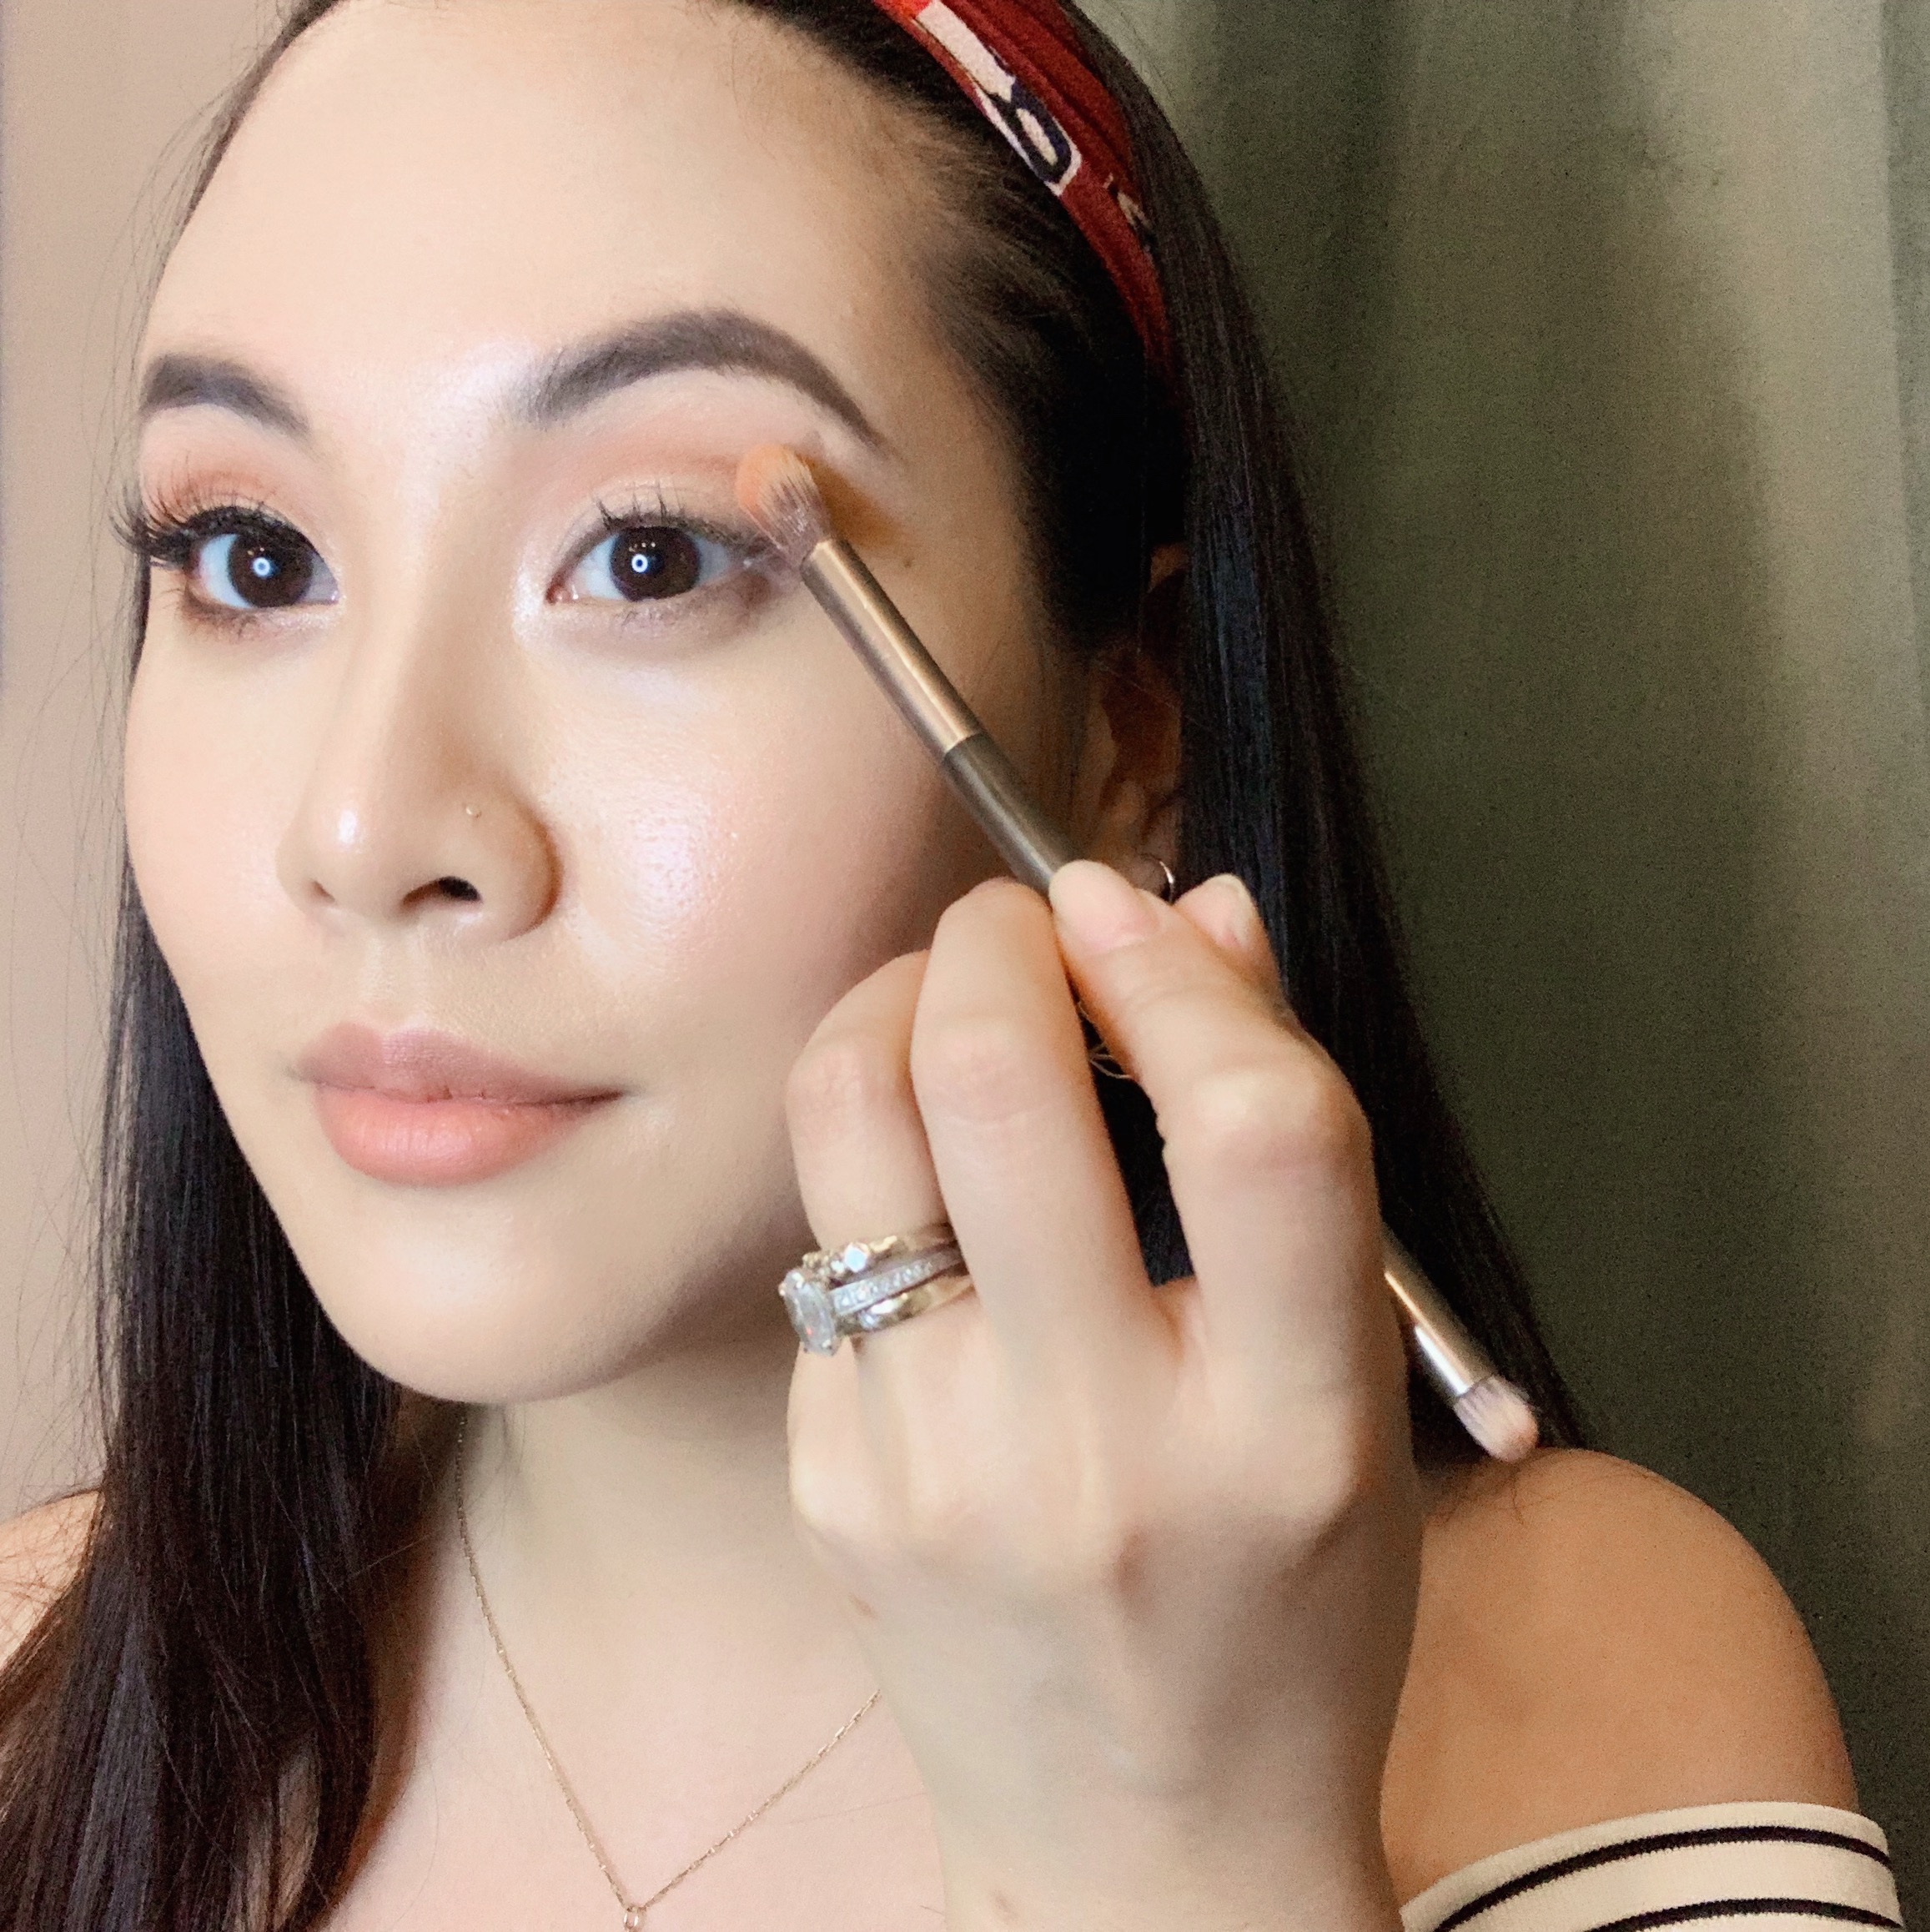
The first thing I did was take a regular shadow brush and apply a light transition color to lay down a base for my eyeshadow. I chose to use Up Front, a matte cream color.

(Photo: Kimberly Wang)
Apply this shade from your top lash line all the way up past your socket. I’d say two-thirds up your eyelid is good enough.
Step two

(Photo: Kimberly Wang)
Next, take your spoon and cup it over your eye. Let the top of the spoon align in your eye socket (but don’t press too hard, because ouch). Since we all have different eye shapes and spoons come in all shapes and sizes, you might have to try a couple of different spoons before you find the right one. (I went through three before this post!) The perfect spoon should run along the curvature of your socket. You want to rest your spoon along the lower part of your socket, right up next to your eye.
Take your small, dense crease brush and dip it in your darkest crease color. Here, I used Power, a matte graphite brown color.

(Photo: Kimberly Wang)
Be sure to tap off the excess shadow your brush picks up before you apply. Remember the rule of thumb with makeup: it’s always easier to apply more than to take it off after you’ve put on too much.
Run the brush along the top ridge of the spoon and into your socket from one corner of your eye to the other in back in forth windshield wiper motions.
Keep this line as close to the edge of the spoon as possible. You don’t want this dark color everywhere — only in the deepest part of your socket line. You don’t need to make this line super neat. We’ll clean it up and blend it out later.
Step three

(Photo: Kimberly Wang)
To blend out this dark and harsh crease line and to warm up the lid, you take your fluffy crease brush and pick up your warmest crease color next. I used Burnt Spice, a rich matte tangerine hue.
(Photo: Kimberly Wang)
Run this warm color over the darkest crease shadow on your lid in the same windshield wiper motions. This time, make the strokes slightly broader than the last time, so you’re both depositing the warm shadow color and also blending out the dark crease color.
For any newbies out there, you might think the fluffy crease brush and the fluffy blending brush look awfully similar. The difference is the crease brush’s hairs are slightly stiffer, so they’re better and depositing color in your socket whereas the blending brush is very soft and good at dispersing intense color.
Step four

(Photo: Kimberly Wang)
Then, using your fluffy blending brush, you want to choose a lighter, peachier color for your blending crease color. I used Hey, a matte marmalade color.

(Photo: Kimberly Wang)
Run your fluffy blending brush along your socket in soft, windshield wiper motions once again. Again, you can be even broader with your strokes (go closer to your eyebrow than before). Your objective is to further blend out the two previous shadows you had laid down.
Step five

(Photo: Kimberly Wang)
You then want to take your regular shadow brush again (I used a different one, but feel free to clean off and reuse the same one from the first step) and dip it in your browbone highlight shade. Here, I used Popular, a glowy vanilla sheen.

(Photo: Kimberly Wang)
Apply this light color along your right under your brows to highlight your brow bone. I also use this opportunity to blend this shadow downwards a bit. You want to blend out the edges from the crease shadows so that what you get is a beautiful wash of color and no distinct lines between the different hues.
Step six
(Photo: Kimberly Wang)
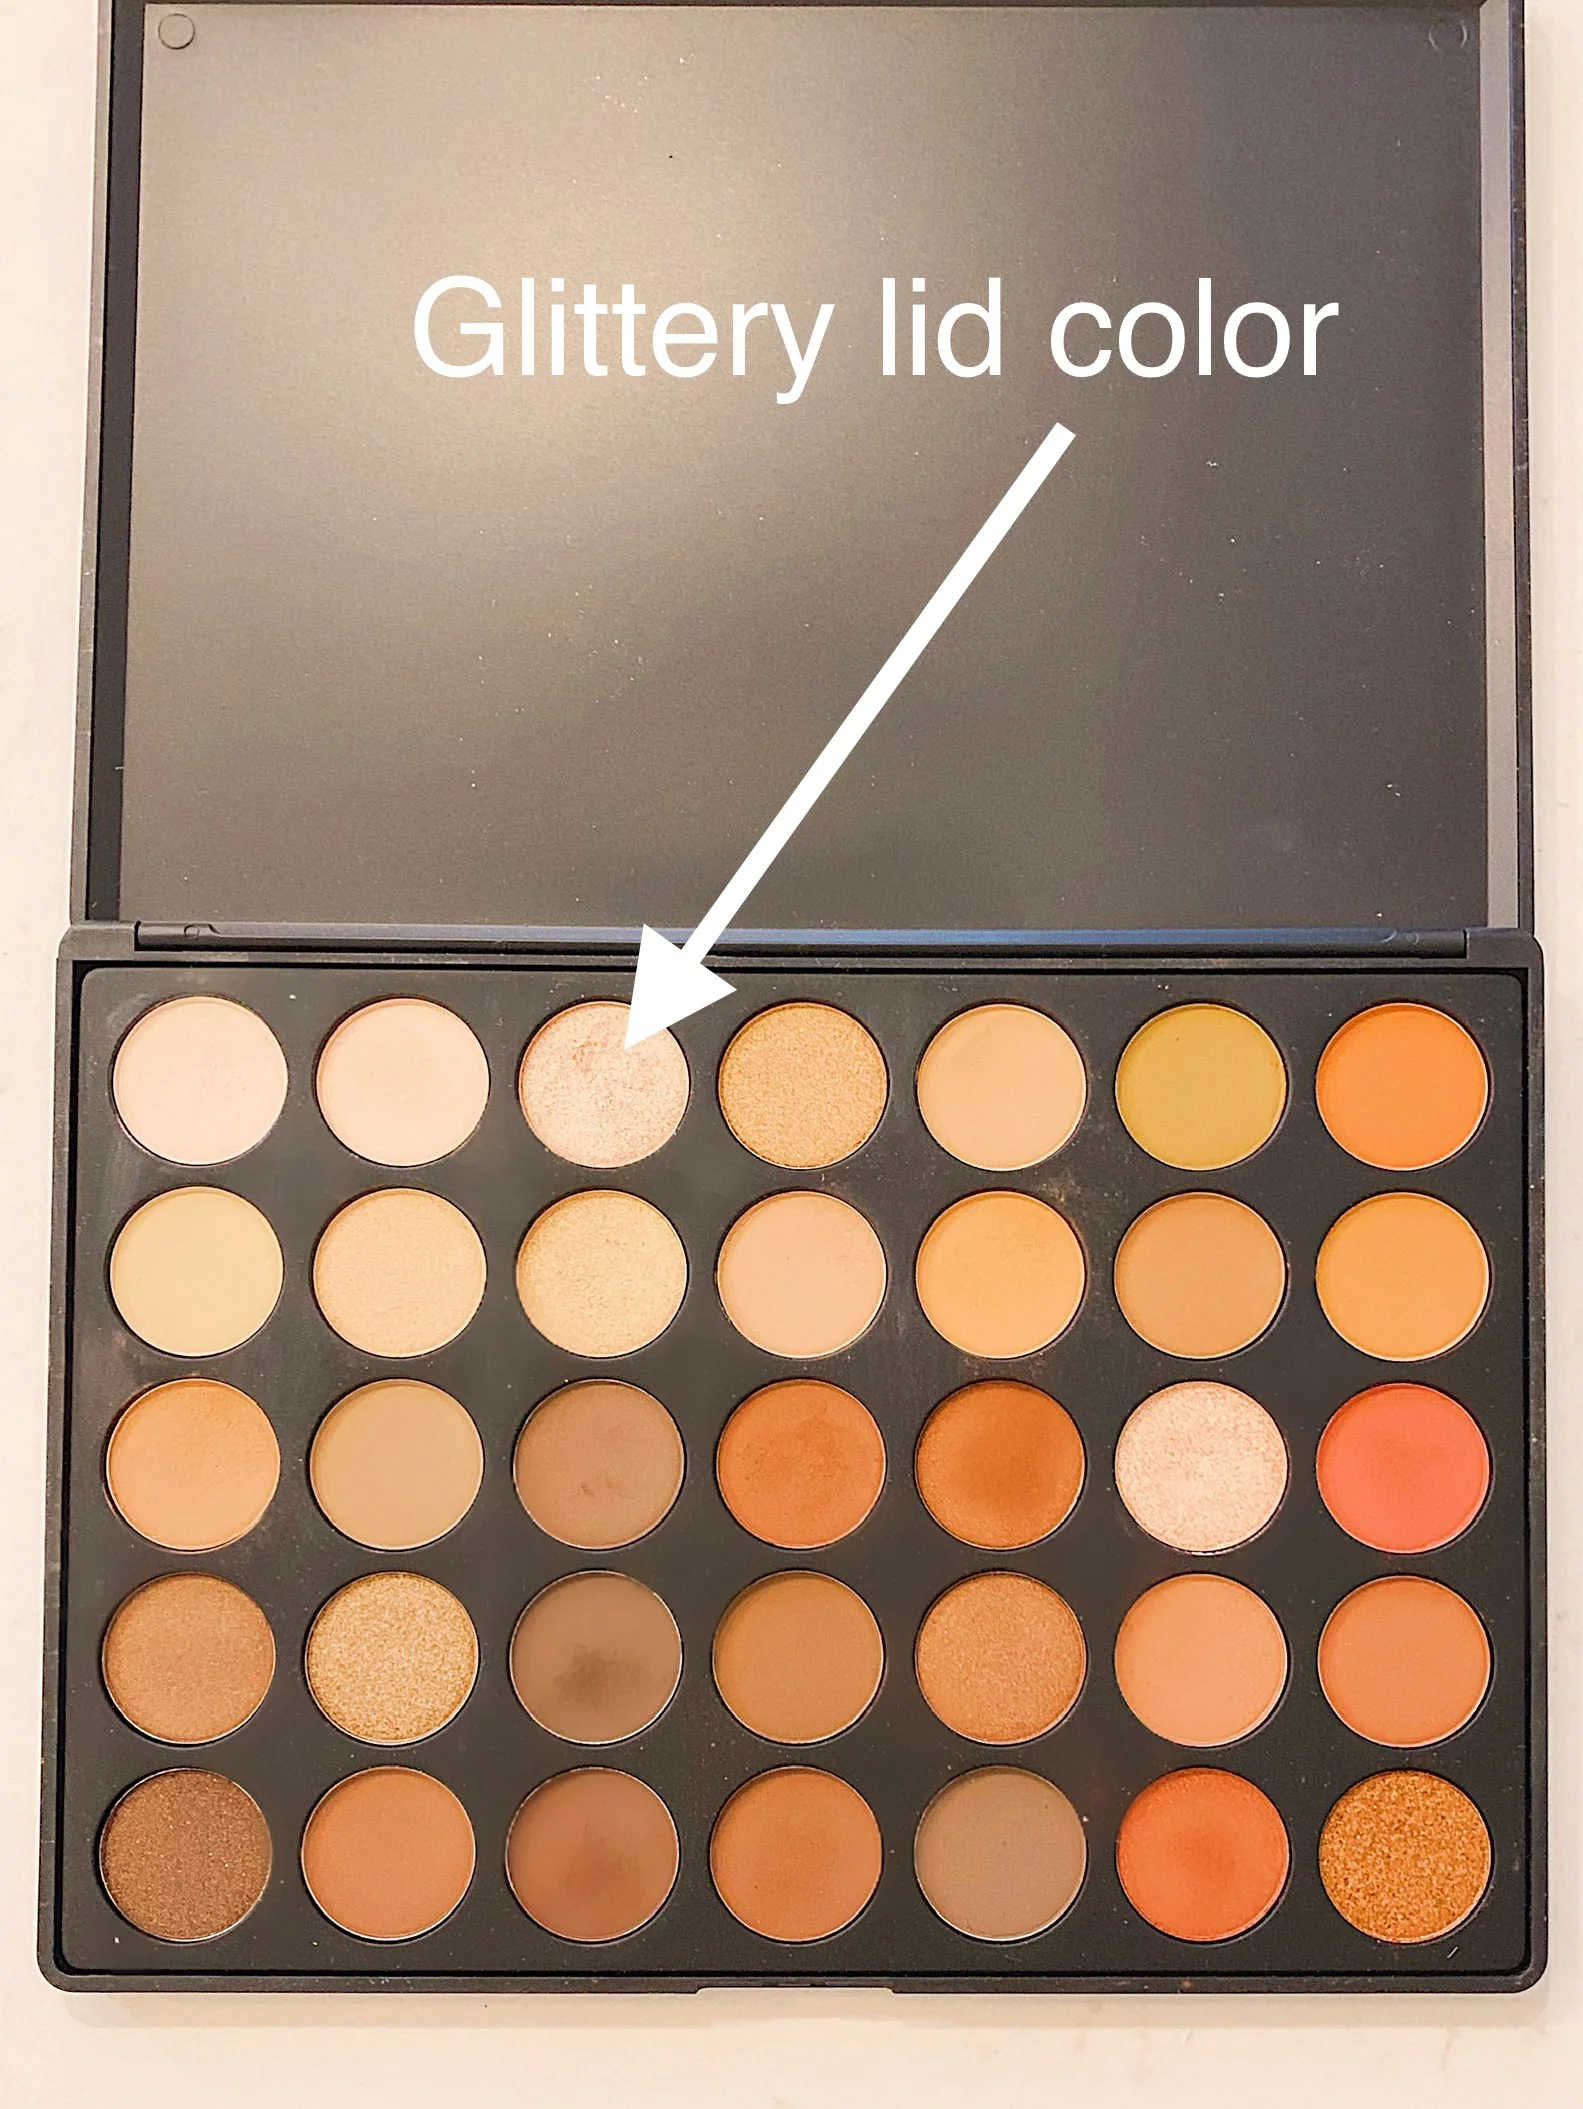
Use your flat eyeshadow brush and pick a glittery lid color to accentuate your lower lid. From my palette, I chose Clear, which has a bright silvery pink shimmer.

(Photo: Kimberly Wang)
Start by applying this bright, glittery color on your inner corners and along the first quarter of your lower lash line. Yes, I said lower, but just the inner quarter of it!
Next, pick up more of this color and in small, patting motions with the brush, apply this color all along the length of your top lash line.
Apply it as far up as the bottommost edge of your socket and don’t go any further up. This is to create the illusion of a larger lid area.
Step seven

(Photo: Kimberly Wang)
Take your angled shadow brush and select a lower lid shadow color. I decided to go with a shimmery medium orange bronze called Riches for this color, but feel free to use one of the crease shades from the top lid — or an entirely different color of your choosing.

(Photo: Kimberly Wang)
Apply this color along your lower lash line from the outer corner of the eye in. Try to make the strokes broader on the outer corners and thinner as you work inwards. Only apply this color three-quarters of the way in.
Step eight

(Photo: Kimberly Wang)
Take your angled liner brush and dip it in a lower liner shade color of your choice. Personally, I feel like lining the lower lash line in black can make my eyes look smaller (although I definitely still use it at times), so I usually prefer to line it with brown.
I also don’t like the harsh look of pencil and liquid liners on myself, so I go ahead and line it with brown eye shadow.

(Photo: Kimberly Wang)
Drag your brush along your lower lash line, as close are you dare to get to your eye. I like to start from the outer corners and work in with small strokes. Feel free to smooth it out with your brush.
Now this part is key: only do the outer three-quarters of your lower lash line. Remember, you already highlighted the inner quarter of your lower lid.
I find that not lining the entire length of my lower lash line, I create a more wide-eyed, awake look.
Finish your look

(Photo: Kimberly Wang)
With a heavy look like this one, you can definitely do a stronger brow + liner + lash combo. I decided to use my trusty Stila Stay All Day Waterproof Liquid Liner ($22) to create a stronger cat eye.
To make my eyes pop, I used Ardell Faux Mink Wispies ($5). And to fill in my brows, I used my Merle Norman Brow Sculpting Pencil to complete my look. I do have microblading, but they look too natural to carry a more glam look like this one.
And that’s it! I know it seems like there are a lot of steps, but it was because I wanted to be as clear as possible. I hope this is helpful to someone out there. If you use these steps, tag me on Instagram so I can check out your look!
While The Off Hours may at times use affiliate links, we always offer genuine editorial recommendations. As an Amazon Associate we earn from qualifying purchases at no additional cost to you.